How to Upload Video to Media Server
This browser is no longer supported.
Upgrade to Microsoft Border to accept advantage of the latest features, security updates, and technical support.
![]()
Looking for Media Services v2 documentation?
Note
Even though this tutorial uses .NET SDK examples, the general steps are the same for REST API, CLI, or other supported SDKs.
Azure Media Services lets you encode your media files into formats that play on a wide variety of browsers and devices. For example, yous might want to stream your content in Apple's HLS or MPEG DASH formats. Before streaming, you should encode your loftier-quality digital media file. For assistance with encoding, see Encoding concept. This tutorial uploads a local video file and encodes the uploaded file. You can also encode content that yous brand attainable via an HTTPS URL.
This tutorial shows you how to:
- Download the sample app described in the topic.
- Examine the lawmaking that uploads, encodes, and streams.
- Run the app.
- Exam the streaming URL.
- Clean upwardly resources.
Prerequisites
- Install Visual Studio Code for Windows/macOS/Linux or Visual Studio 2019 for Windows or Mac.
- Install .NET 5.0 SDK
- Create a Media Services account. Exist sure to copy the API Access details in JSON format or store the values needed to connect to the Media Services business relationship in the .env file format used in this sample.
- Follow the steps in Access the Azure Media Services API with the Azure CLI and salve the credentials. You'll need to use them to access the API in this sample, or enter them into the .env file format.
Download and configure the sample
Clone a GitHub repository that has the streaming .Net sample to your machine using the following command:
git clone https://github.com/Azure-Samples/media-services-v3-dotnet-tutorials.git The sample is located in the UploadEncodeAndStreamFiles folder.
Open up appsettings.json in your downloaded projection. Supervene upon the values with credentials that you got from accessing APIs.
Note
The .gitignore file is already configured to prevent publishing this file into your forked repository.
Examine the code that uploads, encodes, and streams
This section examines functions defined in the Plan.cs file of the UploadEncodeAndStreamFiles project.
The sample performs the following deportment:
- Creates a new Transform (first, checks if the specified Transform exists).
- Creates an output Asset that'due south used as the encoding Job'southward output.
- Create an input Asset and uploads the specified local video file into it. The asset is used as the job's input.
- Submits the encoding chore using the input and output that was created.
- Checks the task's status.
- Creates a Streaming Locator.
- Builds streaming URLs.
Outset using Media Services APIs with the .NET SDK
To beginning using Media Services APIs with .NET, you need to create an AzureMediaServicesClient object. To create the object, you need to supply credentials for the client to connect to Azure past using Azure Agile Directory. Another option is to use interactive hallmark, which is implemented in GetCredentialsInteractiveAuthAsync.
public static async Job<IAzureMediaServicesClient> CreateMediaServicesClientAsync(ConfigWrapper config, bool interactive = imitation) { ServiceClientCredentials credentials; if (interactive) credentials = look GetCredentialsInteractiveAuthAsync(config); else credentials = look GetCredentialsAsync(config); render new AzureMediaServicesClient(config.ArmEndpoint, credentials) { SubscriptionId = config.SubscriptionId, }; } In the code that you cloned at the beginning of the article, the GetCredentialsAsync function creates the ServiceClientCredentials object based on the credentials supplied in the local configuration file (appsettings.json) or through the .env surround variables file in the root of the repository.
individual static async Chore<ServiceClientCredentials> GetCredentialsAsync(ConfigWrapper config) { // Use ConfidentialClientApplicationBuilder.AcquireTokenForClient to get a token using a service principal with symmetric key var scopes = new[] { config.ArmAadAudience + "/.default" }; var app = ConfidentialClientApplicationBuilder.Create(config.AadClientId) .WithClientSecret(config.AadSecret) .WithAuthority(AzureCloudInstance.AzurePublic, config.AadTenantId) .Build(); var authResult = await app.AcquireTokenForClient(scopes) .ExecuteAsync() .ConfigureAwait(false); return new TokenCredentials(authResult.AccessToken, TokenType); } In the case of interactive hallmark, the GetCredentialsInteractiveAuthAsync role creates the ServiceClientCredentials object based on an interactive authentication and the connexion parameters supplied in the local configuration file (appsettings.json) or through the .env environment variables file in the root of the repository. In that case, AADCLIENTID and AADSECRET are not needed in the configuration or surround variables file.
private static async Task<ServiceClientCredentials> GetCredentialsInteractiveAuthAsync(ConfigWrapper config) { var scopes = new[] { config.ArmAadAudience + "/user_impersonation" }; // client application of Az Cli cord ClientApplicationId = "04b07795-8ddb-461a-bbee-02f9e1bf7b46"; AuthenticationResult result = nada; IPublicClientApplication app = PublicClientApplicationBuilder.Create(ClientApplicationId) .WithAuthority(AzureCloudInstance.AzurePublic, config.AadTenantId) .WithRedirectUri("http://localhost") .Build(); var accounts = await app.GetAccountsAsync(); try { result = wait app.AcquireTokenSilent(scopes, accounts.FirstOrDefault()).ExecuteAsync(); } catch (MsalUiRequiredException ex) { attempt { result = look app.AcquireTokenInteractive(scopes).ExecuteAsync(); } catch (MsalException maslException) { Console.Mistake.WriteLine($"ERROR: MSAL interactive hallmark exception with lawmaking '{maslException.ErrorCode}' and message '{maslException.Bulletin}'."); } } grab (MsalException maslException) { Console.Error.WriteLine($"Fault: MSAL silent authentication exception with lawmaking '{maslException.ErrorCode}' and message '{maslException.Message}'."); } render new TokenCredentials(result.AccessToken, TokenType); } Create an input asset and upload a local file into information technology
The CreateInputAsset role creates a new input asset and uploads the specified local video file into it. This nugget is used as the input to your encoding job. In Media Services v3, the input to a job can either be an asset or content that you make available to your Media Services account via HTTPS URLs.
In Media Services v3, you use Azure Storage APIs to upload files. The following .Internet snippet shows how.
The following part performs these actions:
-
Creates an Nugget.
-
Gets a writable SAS URL to the asset'southward container in storage.
If using nugget's ListContainerSas role to get SAS URLs, annotation that the function returns multiple SAS URLs as in that location are two storage account keys for each storage business relationship. A storage account has two keys considering it allows for seamless rotation of storage account keys (for case, change one while using the other so start using the new fundamental and rotate the other cardinal). The 1st SAS URL represents storage key1 and second i storage key2.
-
Uploads the file into the container in storage using the SAS URL.
private static async Task<Asset> CreateInputAssetAsync( IAzureMediaServicesClient client, string resourceGroupName, string accountName, string assetName, cord fileToUpload) { // In this case, we are assuming that the asset name is unique. // // If you already have an nugget with the desired proper name, employ the Assets.Go method // to get the existing asset. In Media Services v3, the Get method on entities returns zero // if the entity doesn't exist (a case-insensitive check on the name). // Call Media Services API to create an Asset. // This method creates a container in storage for the Asset. // The files (blobs) associated with the nugget volition exist stored in this container. Asset nugget = await client.Assets.CreateOrUpdateAsync(resourceGroupName, accountName, assetName, new Asset()); // Use Media Services API to get back a response that contains // SAS URL for the Nugget container into which to upload blobs. // That is where you would specify read-write permissions // and the exparation time for the SAS URL. var response = look client.Assets.ListContainerSasAsync( resourceGroupName, accountName, assetName, permissions: AssetContainerPermission.ReadWrite, expiryTime: DateTime.UtcNow.AddHours(iv).ToUniversalTime()); var sasUri = new Uri(response.AssetContainerSasUrls.First()); // Use Storage API to go a reference to the Asset container // that was created by calling Asset's CreateOrUpdate method. BlobContainerClient container = new BlobContainerClient(sasUri); BlobClient blob = container.GetBlobClient(Path.GetFileName(fileToUpload)); // Apply Strorage API to upload the file into the container in storage. await blob.UploadAsync(fileToUpload); render asset; } Create an output asset to store the upshot of a job
The output Nugget stores the outcome of your encoding chore. The project defines the DownloadResults function that downloads the results from this output asset into the "output" binder, and so you can run into what you got.
private static async Job<Asset> CreateOutputAssetAsync(IAzureMediaServicesClient client, string resourceGroupName, string accountName, cord assetName) { bool existingAsset = truthful; Asset outputAsset; endeavour { // Cheque if an Nugget already exists outputAsset = expect client.Avails.GetAsync(resourceGroupName, accountName, assetName); } catch (ErrorResponseException ex) when (ex.Response.StatusCode == Organisation.Internet.HttpStatusCode.NotFound) { existingAsset = imitation; } Asset nugget = new Asset(); string outputAssetName = assetName; if (existingAsset) { // Name collision! In order to get the sample to piece of work, let's just get ahead and create a unique asset name // Notation that the returned Asset tin have a different name than the one specified as an input parameter. // Yous may want to update this function to throw an Exception instead, and handle proper noun collisions differently. string uniqueness = $"-{Guid.NewGuid():N}"; outputAssetName += uniqueness; Console.WriteLine("Alarm – establish an existing Nugget with name = " + assetName); Panel.WriteLine("Creating an Nugget with this name instead: " + outputAssetName); } return await client.Assets.CreateOrUpdateAsync(resourceGroupName, accountName, outputAssetName, asset); } Create a Transform and a Job that encodes the uploaded file
When encoding or processing content in Media Services, it's a common pattern to gear up the encoding settings every bit a recipe. Y'all would then submit a Job to apply that recipe to a video. Past submitting new jobs for each new video, you're applying that recipe to all the videos in your library. A recipe in Media Services is called a Transform. For more information, run across Transforms and Jobs. The sample described in this tutorial defines a recipe that encodes the video in order to stream it to a variety of iOS and Android devices.
Transform
When creating a new Transform instance, yous need to specify what yous desire it to produce equally an output. The required parameter is a TransformOutput object, as shown in the code below. Each TransformOutput contains a Preset. Preset describes the footstep-by-step instructions of video and/or audio processing operations that are to be used to generate the desired TransformOutput. The sample described in this commodity uses a built-in Preset called AdaptiveStreaming. The Preset encodes the input video into an auto-generated bitrate ladder (bitrate-resolution pairs) based on the input resolution and bitrate, and produces ISO MP4 files with H.264 video and AAC audio corresponding to each bitrate-resolution pair. For information about this Preset, see automobile-generating bitrate ladder.
You can utilise a built-in EncoderNamedPreset or use custom presets.
When creating a Transform, you lot should get-go check if one already exists using the Become method, as shown in the code that follows. In Media Services v3, Become methods on entities return zero if the entity doesn't exist (a case-insensitive check on the name).
private static async Task<Transform> GetOrCreateTransformAsync( IAzureMediaServicesClient client, cord resourceGroupName, string accountName, string transformName) { bool createTransform = fake; Transform transform = nil; endeavor { // Does a transform already exist with the desired name? Assume that an existing Transform with the desired name // too uses the same recipe or Preset for processing content. transform = client.Transforms.Go(resourceGroupName, accountName, transformName); } catch (ErrorResponseException ex) when (ex.Response.StatusCode == System.Net.HttpStatusCode.NotFound) { createTransform = true; } if (createTransform) { // Yous need to specify what you want it to produce as an output TransformOutput[] output = new TransformOutput[] { new TransformOutput { // The preset for the Transform is set to i of Media Services built-in sample presets. // Yous can customize the encoding settings by changing this to utilize "StandardEncoderPreset" class. Preset = new BuiltInStandardEncoderPreset() { // This sample uses the congenital-in encoding preset for Adaptive Bitrate Streaming. PresetName = EncoderNamedPreset.AdaptiveStreaming } } }; // Create the Transform with the output defined higher up transform = await customer.Transforms.CreateOrUpdateAsync(resourceGroupName, accountName, transformName, output); } return transform; } Job
Every bit mentioned above, the Transform object is the recipe and a Job is the actual request to Media Services to apply that Transform to a given input video or audio content. The Task specifies information like the location of the input video, and the location for the output.
In this example, the input video has been uploaded from your local auto.
private static async Task<Job> SubmitJobAsync(IAzureMediaServicesClient client, string resourceGroupName, string accountName, string transformName, cord jobName, cord inputAssetName, string outputAssetName) { // Utilise the name of the created input asset to create the job input. JobInput jobInput = new JobInputAsset(assetName: inputAssetName); JobOutput[] jobOutputs = { new JobOutputAsset(outputAssetName), }; // In this example, we are assuming that the task proper noun is unique. // // If you lot already take a chore with the desired name, use the Jobs.Get method // to become the existing job. In Media Services v3, the Get method on entities returns null // if the entity doesn't exist (a case-insensitive bank check on the proper noun). Job job = await client.Jobs.CreateAsync( resourceGroupName, accountName, transformName, jobName, new Job { Input = jobInput, Outputs = jobOutputs, }); return job; } Wait for the Task to consummate
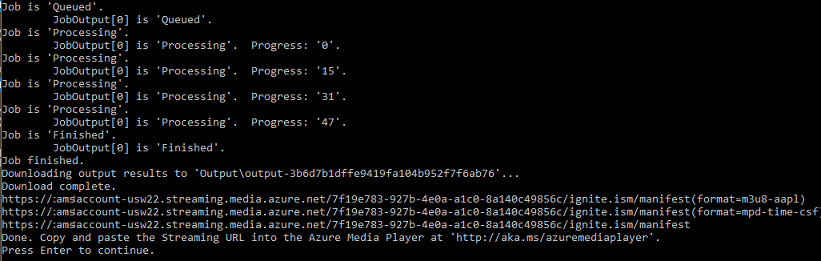
The chore takes some fourth dimension to complete and when information technology does you desire to be notified. The code sample below shows how to poll the service for the condition of the Job. Polling isn't a recommended best practice for production apps considering of potential latency. Polling tin be throttled if overused on an business relationship. Developers should instead use Outcome Filigree.
Outcome Grid is designed for high availability, consequent performance, and dynamic scale. With Issue Grid, your apps can heed for and react to events from about all Azure services, as well as custom sources. Unproblematic, HTTP-based reactive event handling helps you build efficient solutions through intelligent filtering and routing of events. See Route events to a custom web endpoint.
The Chore usually goes through the following states: Scheduled, Queued, Processing, Finished (the terminal state). If the job has encountered an mistake, you get the Error state. If the job is in the process of existence canceled, you lot go Canceling and Canceled when it'southward done.
private static async Job<Job> WaitForJobToFinishAsync(IAzureMediaServicesClient client, string resourceGroupName, cord accountName, string transformName, cord jobName) { const int SleepIntervalMs = twenty * thou; Job job; do { job = await client.Jobs.GetAsync(resourceGroupName, accountName, transformName, jobName); Console.WriteLine($"Job is '{job.State}'."); for (int i = 0; i < job.Outputs.Count; i++) { JobOutput output = chore.Outputs[i]; Panel.Write($"\tJobOutput[{i}] is '{output.State}'."); if (output.State == JobState.Processing) { Console.Write($" Progress (%): '{output.Progress}'."); } Console.WriteLine(); } if (chore.Land != JobState.Finished && job.State != JobState.Error && job.State != JobState.Canceled) { wait Task.Delay(SleepIntervalMs); } } while (task.Land != JobState.Finished && job.State != JobState.Error && chore.State != JobState.Canceled); return job; } Job error codes
See Mistake codes.
Get a Streaming Locator
Subsequently the encoding is complete, the next step is to make the video in the output Asset available to clients for playback. You tin can make it available in two steps: first, create a Streaming Locator, and second, build the streaming URLs that clients can use.
The process of creating a Streaming Locator is called publishing. By default, the Streaming Locator is valid immediately later you brand the API calls, and lasts until it'due south deleted, unless yous configure the optional start and end times.
When creating a StreamingLocator, you'll demand to specify the desired StreamingPolicyName. In this example, you'll be streaming in-the-clear (or not-encrypted content) so the predefined clear streaming policy (PredefinedStreamingPolicy.ClearStreamingOnly) is used.
Important
When using a custom Streaming Policy, you should design a limited set of such policies for your Media Service account, and re-utilize them for your StreamingLocators whenever the same encryption options and protocols are needed. Your Media Service account has a quota for the number of Streaming Policy entries. You shouldn't be creating a new Streaming Policy for each Streaming Locator.
The following code assumes that you're calling the function with a unique locatorName.
private static async Task<StreamingLocator> CreateStreamingLocatorAsync( IAzureMediaServicesClient client, string resourceGroup, string accountName, string assetName, cord locatorName) { StreamingLocator locator = await client.StreamingLocators.CreateAsync( resourceGroup, accountName, locatorName, new StreamingLocator { AssetName = assetName, StreamingPolicyName = PredefinedStreamingPolicy.ClearStreamingOnly }); return locator; } While the sample in this topic discusses streaming, you can use the same call to create a Streaming Locator for delivering video via progressive download.
Get streaming URLs
At present that the Streaming Locator has been created, yous can get the streaming URLs, equally shown in GetStreamingURLs. To build a URL, you lot need to concatenate the Streaming Endpoint host name and the Streaming Locator path. In this sample, the default Streaming Endpoint is used. When you first create a Media Service business relationship, this default Streaming Endpoint volition exist in a stopped land, and so you lot need to call Showtime.
Annotation
In this method, y'all need the locatorName that was used when creating the Streaming Locator for the output Asset.
private static async Job<IList<string>> GetStreamingUrlsAsync( IAzureMediaServicesClient client, string resourceGroupName, string accountName, String locatorName) { const string DefaultStreamingEndpointName = "default"; IList<string> streamingUrls = new List<string>(); StreamingEndpoint streamingEndpoint = await client.StreamingEndpoints.GetAsync(resourceGroupName, accountName, DefaultStreamingEndpointName); if (streamingEndpoint.ResourceState != StreamingEndpointResourceState.Running) { await client.StreamingEndpoints.StartAsync(resourceGroupName, accountName, DefaultStreamingEndpointName); } ListPathsResponse paths = look customer.StreamingLocators.ListPathsAsync(resourceGroupName, accountName, locatorName); foreach (StreamingPath path in paths.StreamingPaths) { UriBuilder uriBuilder = new UriBuilder { Scheme = "https", Host = streamingEndpoint.HostName, Path = path.Paths[0] }; streamingUrls.Add(uriBuilder.ToString()); } render streamingUrls; } Clean up resources in your Media Services account
Generally, yous should clean up everything except objects that yous're planning to reuse (typically, you lot'll reuse Transforms, and you'll persist StreamingLocators, etc.). If y'all want your business relationship to be make clean after experimenting, delete the resources that yous don't plan to reuse. For example, the post-obit lawmaking deletes the job, created avails and content key policy:
private static async Chore CleanUpAsync( IAzureMediaServicesClient client, string resourceGroupName, string accountName, string transformName, string jobName, Listing<string> assetNames, string contentKeyPolicyName = null ) { await client.Jobs.DeleteAsync(resourceGroupName, accountName, transformName, jobName); foreach (var assetName in assetNames) { await customer.Assets.DeleteAsync(resourceGroupName, accountName, assetName); } if (contentKeyPolicyName != null) { customer.ContentKeyPolicies.Delete(resourceGroupName, accountName, contentKeyPolicyName); } } Run the sample app
- Printing Ctrl+F5 to run the EncodeAndStreamFiles app.
- Copy one of the streaming URLs from the console.
This example displays URLs that tin can be used to play back the video using dissimilar protocols:
Exam the streaming URL
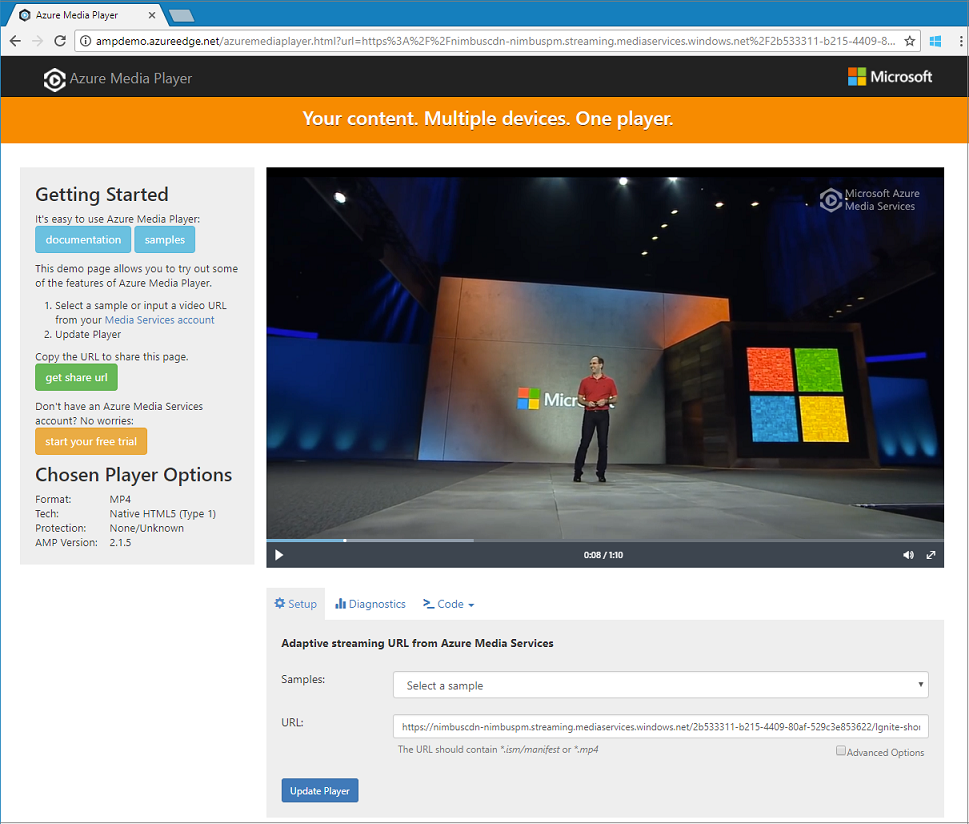
To test the stream, this article uses Azure Media Player.
Note
If a histrion is hosted on an https site, make sure to update the URL to "https".
- Open a spider web browser and navigate to https://aka.ms/azuremediaplayer/.
- In the URL: box, paste one of the streaming URL values y'all got when y'all ran the app.
- Select Update Player.
Azure Media Player tin be used for testing simply shouldn't exist used in a production surroundings.
Clean up resource
If yous no longer need any of the resource in your resource group, including the Media Services and storage accounts you lot created for this tutorial, delete the resource group you created earlier.
Execute the following CLI control:
az group delete --proper noun amsResourceGroup Multithreading
The Azure Media Services v3 SDKs aren't thread-safe. When developing a multi-threaded app, you should generate and use a new AzureMediaServicesClient object per thread.
Source: https://docs.microsoft.com/en-us/azure/media-services/latest/stream-files-tutorial-with-api
0 Response to "How to Upload Video to Media Server"
Post a Comment