Can You Manually Create a Csv File and Upload to Shopify

Every decent e-commerce platform offers built-in import and export tools . However, they are usually far from being an omnipotent solution that tin can cope with any business concern requirement. In view of this, agencies create third-political party solutions that close the existing gaps betwixt the platform's objective reality and the merchants' subjective needs. What about Shopify ? What data transfer solutions does it offer? What reliable alternatives are currently available in the ecosystem?
In this Shopify import guide , you will find out what import functionality is hidden behind the platform and how to enhance information technology in the most convenient and at the same time powerful mode. Let's explore the organisation'southward native capabilities get-go and then proceed to the well-nigh powerful third-party solution that copes with any information transfer challenges and enables any Shopify import customizations – Firebear Improved Import & Export App for Shopify .
Below, you lot will learn about the basic import capabilities of Shopify . We describe how to transfer products to your e-commerce website using its built-in functionality. The article examines 2 different cases: importing products from another website and reimporting them within the borders of your store. In addition to that, nosotros provide a CSV file construction required in the ecosystem. The same tutorials are bachelor for other entities: nosotros teach how to import inventory, customers, and orders to Shopify .

(Download for Free)
Earlier going any further, we should remind you that the Firebear squad has vast experience transferring data between Magento ii and all possible external systems. Furthermore, we can also help you migrate to Shopify or move data between your east-commerce website and external tools. Our specialists are capable of Shopify integrations of any complexity. Contact us for more detail.
Table of contents
- 1 Shopify Import Capabilities
- 1.1 How to import products to Shopify
- 1.i.1 Importing products from some other store
- 1.1.2 Reimporting products from Shopify
- 1.1.iii Shopify product import: CSV file format
- one.two How to import inventory to Shopify
- 1.two.1 Shopify inventory import: CSV file format
- 1.iii How to import customers to Shopify
- 1.three.1 Shopify customer import: CSV file format
- 1.4 How to import orders to Shopify
- 1.1 How to import products to Shopify
- ii Firebear Improved Import & Consign App for Shopify
- 3 Shopify Import FAQ
- iii.ane Can I upload a CSV to Shopify?
- 3.2 Tin yous bulk upload products to Shopify?
- iii.3 How do I import customers to Shopify?
- three.4 How practice I import items into Shopify?
- 3.5 How many products can I upload to Shopify?
- 3.6 How practise I import a product image into Shopify?
Shopify Import Capabilities
Shopify lets you import several entities by default. Still, there is no single interface where y'all can command all data transfers. You are likewise bound to CSV files and cannot automate import processes. Likewise, diverse useful data transfer features are available in Shopify Plus only. Let's take a expect at what you get.
How to import products to Shopify
Why do you need to import products to Shopify? Firstly, considering you migrate from another platform. It is the fastest way to recreate your electric current product catalog on a new storefront.
Secondly, you may leverage this functionality to update your products or inventory. However, it is necessary to export the corresponding data to go a CSV file that reflects the current country of things. Then, yous can edit it and reimport the updated data back into the organization.
Bear in mind that you always need to support your product data to prevent any data loss. For instance, importing a CSV file edited in Microsoft Excel or Numbers often leads to the absent production images and other issues. Therefore, information technology is extremely of import to create a correct copy of your itemize earlier applying any changes.
Importing products from some other store
Allow'south assume that yous've exported a CSV file with products from another platform and now need to transfer this data to Shopify. Unfortunately, yous cannot exercise that since the existing sheet is arranged according to the external platform'southward requirements. Edit information technology to match Shopify's CSV file format. Notation that fifty-fifty a missing header leads to the import failure.
Another limitation is associated with file size. Yous cannot import more than than 15MB of product data to Shopify.
Equally for the import process itself, information technology is quite simple. You only need to follow these steps:
- Become to Shopify admin -> Products -> All products and hit the Import button.
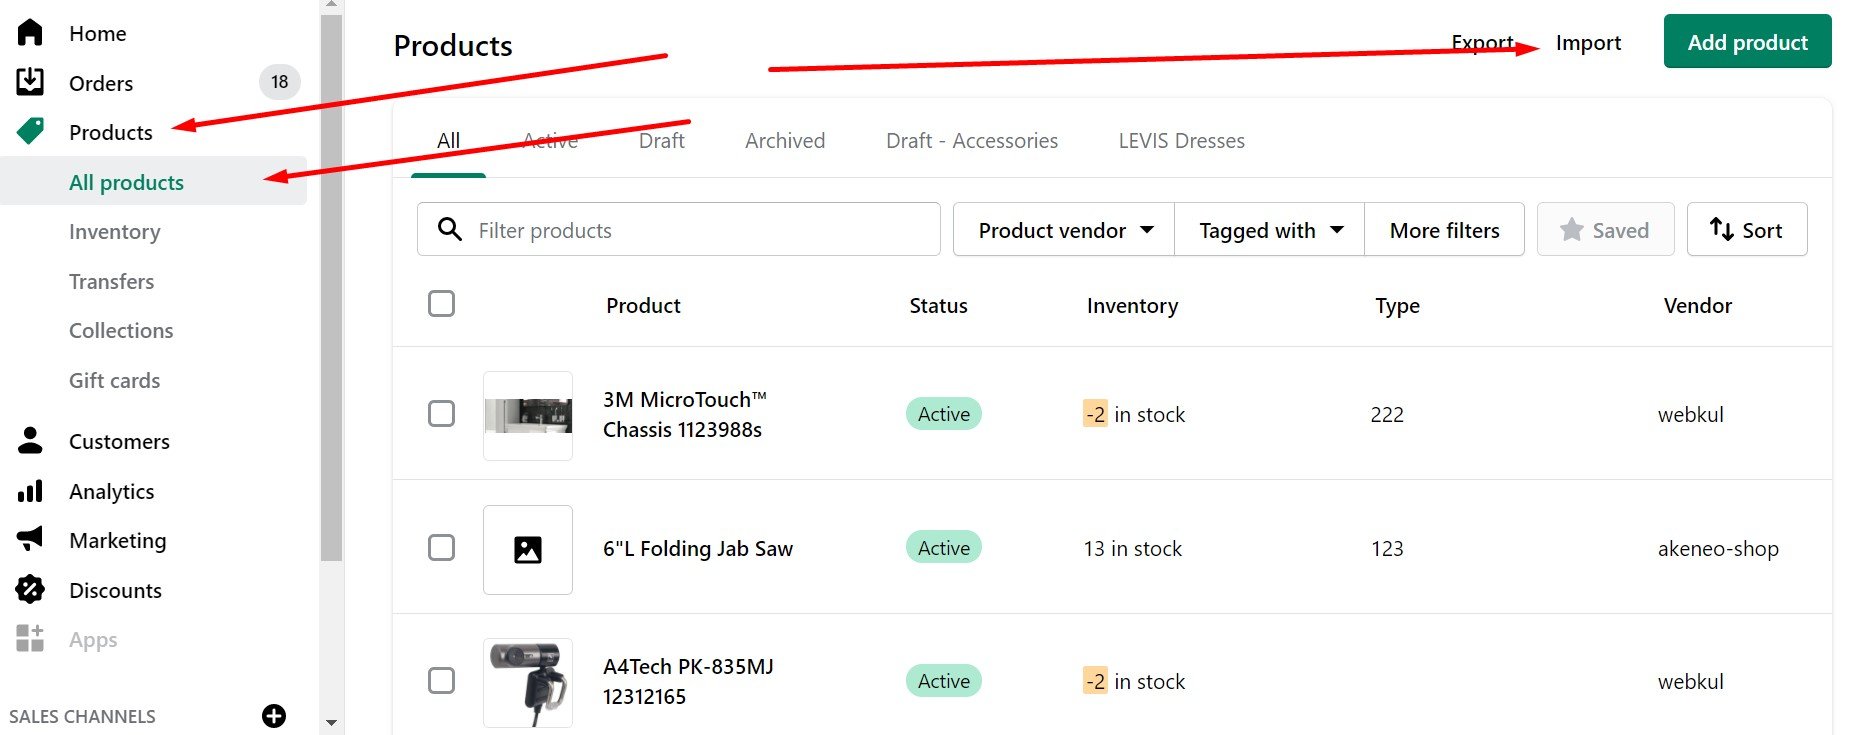
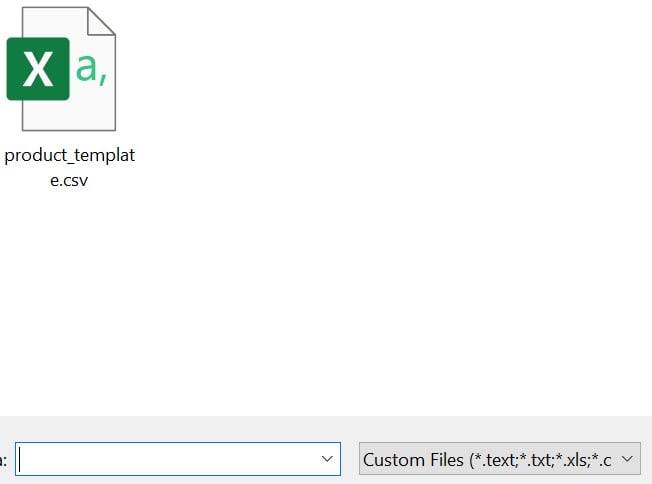
- The Import products by CSV file window displays. Click Choose File there.
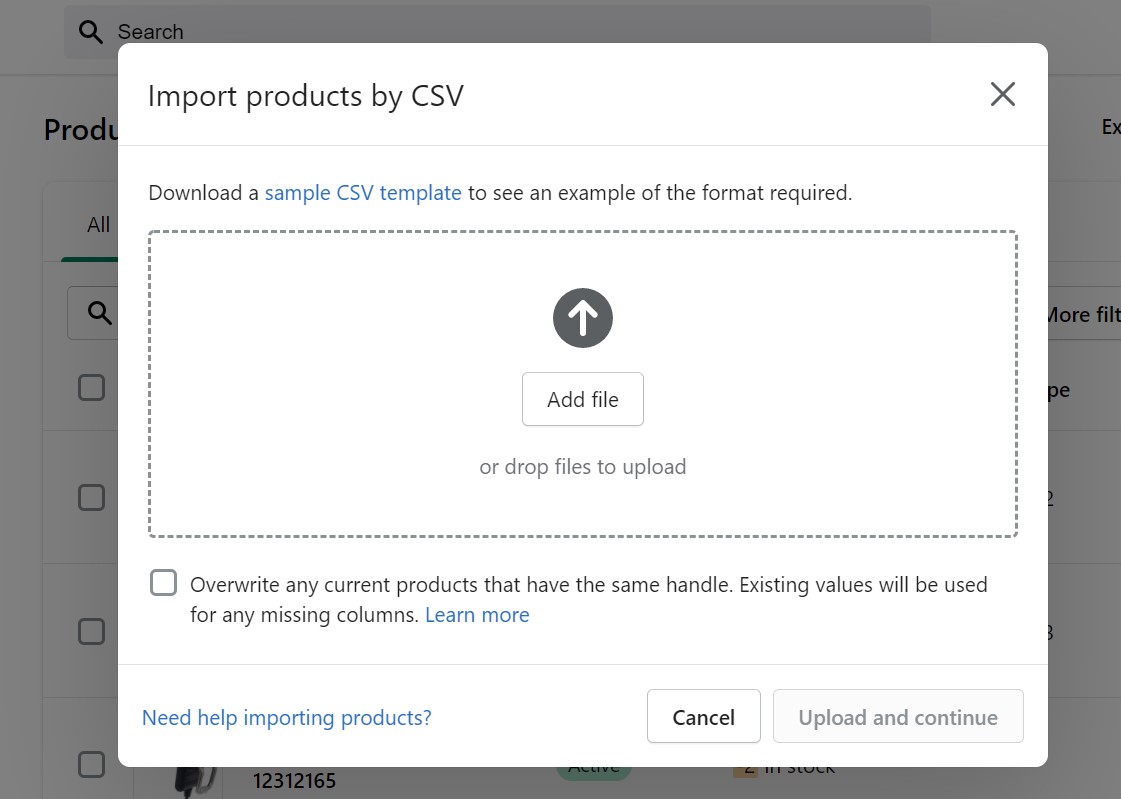
- Locate your production CSV and click Open .
- Upload the file .
That'due south it. When the process is complete, you receive a confirmation e-mail.
Reimporting products from Shopify
Shopify enables you to utilize changes to your itemize items via CSV. Export your products, edit the CSV file and reimport information technology dorsum into your Shopify store. However, this method doesn't piece of work if yous rely on Oberlo and other similar apps to add products to your website.
Yous tin can import products to Shopify as follows:
- Become to Shopify admin -> Products -> All products and hit the Import button.
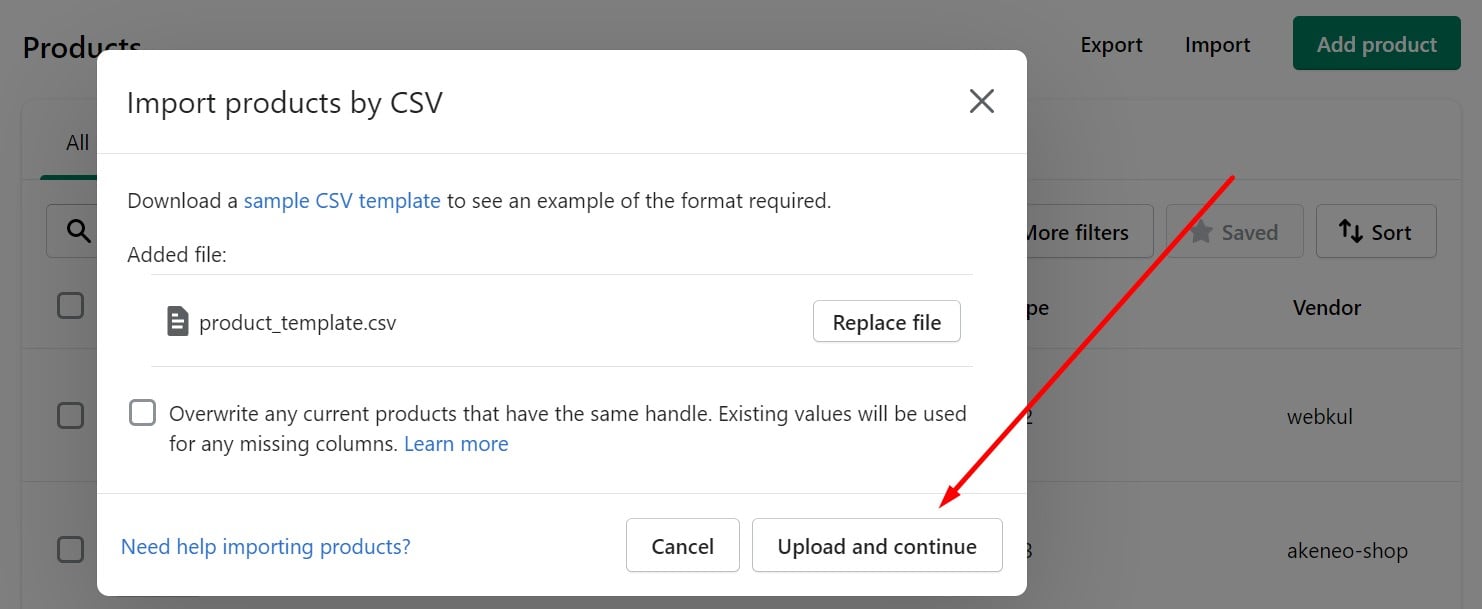
- The Import products by CSV file window displays. Click Choose File there.
- Locate your product CSV and click Open up .
- By enabling the Overwrite any electric current products that have the same handle feature, yous override the corresponding Shopify data. For columns that aren't present in the CSV file, the corresponding product data remains untouched. For instance, if you transfer items without price information, Shopify will go on the existing values.
- Upload the file .
A confirmation email is sent upon a successful upload.
Shopify production import: CSV file format
Below, you tin can see a listing that shows the structure of a typical product file supported in Shopify.
Handle. Here, yous should specify unique product names using messages, dashes, and numbers. Note that spaces, accents, periods, and other characters are prohibited.
It is also worth mentioning that Shopify uses handles in product URLs.
Likewise, Shopify treats every line in the CSV file that starts with a different handle as a new product. However, you can use multiple lines with the aforementioned handle to add multiple images to a single product. Since this field is required, it cannot exist bare or missing.
Championship. This column contains the title of your product — for instance, Women's Hoodie. Since this field is required, information technology cannot be blank or missing.
Torso (HTML). Here, you can provide the product description in HTML format or as plain text. This one can be bare.
Vendor. The vendor proper noun for the product is shown here. It should contain more than two characters. The field is required only can be blank.
Type. This column displays the product blazon, such as Snowboard. You can leave information technology blank.
Tags. Here, you tin can place a comma-separated list of tags associated with the production. Add quotes around the tags if they are absent: "tag1, tag2, tag3". This ane can be blank.
Published. In this column, you provide information on whether a product is published on your storefront or not:
- True – the production is published;
- FALSE – the production is hidden.
The field is required. Leaving it blank publishes the production.
Option1 Name. Specify a product pick name (Color) if an item contains options. Set information technology to Title for products with only i option. Since this field is required, it cannot exist blank or missing.
Option1 Value. If a production is associated with an option, you should enter its value hither (White).
For products with only one pick, set it to Default Title. Too, note that changing data in this column replaces the existing variant IDs. This process usually breaks third-party dependencies on variant IDs. Since this field is required, it cannot be blank or missing.
Option2 Name. If a product has the 2d choice, specify information technology here. This column tin can be blank.
Option2 Value. Enter the value of the second option here. Note that you can leave the field blank.
Option3 Name. If a product has the third option, specify it here. You can leave this column bare.
Option3 Value. Enter the value of the tertiary option here or get out it empty.
Variant SKU. In this cavalcade, you lot should type the SKU of a product or variant. The provided information is used to track inventory with the help of inventory tracking services. The field can be blank unless y'all use custom fulfillment services.
Variant Grams. This column contains the production or variant weight in grams. It is prohibited to specify a unit of measurement or employ decimals hither. If your product weight is 1.239 kg, you should specify it as 1239.
Also, annotation that Shopify imports and exports the weight in grams. It usually happens fifty-fifty if you set up a dissimilar unit on your website. Therefore, use only accurate weights to offer correct carrier-calculated shipping. Since this field is required, information technology cannot be blank or missing. You must specify a value, even if it is 0.
Variant Inventory Tracker. This cavalcade contains inventory tracking details for a variant or product. Such values equally shopify , amazon_marketplace_web , and shipwire are under your disposal. Leave the column blank if inventory isn't tracked. The field can exist blank. In the instance when the existing inventory tracking options are removed, the inventory is no longer tracked.
Variant Inventory Qty. Here, Shopify displays the number of items bachelor in stock. Annotation that the column is just related to Shopify stores with a unmarried location. Shopify doesn't include this column for stores with the inventory at multiple locations. You can leave it blank.
Variant Inventory Policy. In this column, yous can specify the behavior towards orders when the inventory level for a corresponding production or variant reaches zero.
- deny – a production cannot be purchased later its inventory level reaches null;
- continue – a product tin be purchased later its inventory level reaches nil: negative inventory levels are enabled.
Since this field is required, information technology cannot be bare or missing.
Variant Fulfillment Service. Hither, the system displays a fulfillment service responsible for the product or variant fulfillment. Possible values are:
- manual;
- webgistix;
- shipwire;
- amazon_marketplace_web .
It is also possible to specify the proper name of your custom fulfillment service here. Note that it is necessary to utilize lowercase letters and supervene upon spaces with a dash (-). Also, remove periods and other special characters. And don't forget to ready a in your Shopify admin earlier calculation its name in this column. Since this field is required, it cannot be blank or missing.
Variant Price. Here, Shopify lets yous prepare the price of the product or its variant. Note that currency symbols are prohibited. Therefore, you should specify a product price like this: 47.98. Since this field is required, it cannot be blank or missing.
Variant Compare at Price. The "Compare at Price" feature of the product or variant is related to this cavalcade. The requirements are the aforementioned: you shouldn't use currency symbols. The field can exist blank.
Variant Requires Shipping. Here, Shopify contains options that bear witness whether aircraft is required or not. Truthful and Faux are two possible values. If you leave the column bare, the system understands it like Faux.
Variant Taxable. Here, yous can specify whether taxes are applied to a variant or not. The values are Truthful and False correspondingly. If you leave the column blank, the system understands information technology like False.
Variant Barcode. Shopify uses this column to add a product barcode, ISBN, or UPC. It can exist blank.
Paradigm Src. This column allows you lot to specify the URL of a product image. The system downloads images during the import and uploads them back. Nonetheless, they are not variant-specific. You should specify variant images in the variant image column.
Notation that it is prohibited to edit the prototype file name after uploading information technology to your store. Images that have _thumb , _small , or _medium suffixes in their names are not allowed. The field tin exist blank.
Paradigm Position. In this column, you can specify the sort order for images that appear on a product page. Set the number representing the social club in which you lot want the prototype to exist displayed on the frontend. Shopify shows them from smallest to largest. Enter i to permit the paradigm appear first for that production. The field can be bare.
Paradigm Alt Text. Alt text of an image is stored here. It is displayed when an image can't load. Besides, assistive technologies use it to depict an prototype to a customer who'southward visually impaired. And, of grade, it is a reliable SEO instrument. Although y'all can use up to 512 characters, the optimal recommended length is 125 characters. The field can exist blank.
Souvenir Card. Here, the system places data necessary to determine whether the product is a gift card or not. As you might have already guessed, valid values are Truthful or FALSE. You need to create gift cards in admin prior to changing the corresponding fields in a CSV file. The field can exist blank.
SEO Title. You tin detect the SEO Championship under the Search engine list preview header in the Page title field on the product details page. The SEO Title consists of letters and numbers. The character limit is 70.
You can leave this field bare. If so, the field will exist automatically populated with the production title on import. Notation that it is optional.
SEO Description. The SEO Clarification is situated in the Meta clarification field on the product details page. You can use not more than 320 letters and numbers here. Annotation that it is possible to leave this field bare. If so, the field will be automatically populated with the product description on import.
Google Shopping metafields. It is possible to ignore fields in the columns that include Google Shopping in their names. Notwithstanding, some situations may require using them. Therefore, this field is optional.
Variant Image. Hither, you tin can specify functioning image URLs of variants. But it is optional.
Variant Weight Unit of measurement. Shopify uses just the following values:
- m;
- kg;
- lb;
- oz.
The field is optional. If it is bare, the default value is kg .
Variant Tax Code. This column is available in Shopify Plus only if information technology is integrated with Avalara AvaTax. Don't import a CSV file with this column filled in with data into a store that isn't connected to Avalara.
Cost per item. Hither, Shopify specifies the production or variant toll for y'all. Currency symbols are even so prohibited. The field is optional.
Condition
- agile – the product is bachelor on your storefront;
- typhoon – you deal with a draft that needs to be completed;
- archived – information technology is an archived item that is no longer bachelor on the storefront.
This field is required. When you don't add the cavalcade to your CSV file, all products are uploaded as active.
Shopify lets you add only 1 additional cavalcade to a CSV file and import it successfully. The Collection column lets you organize products into collections by uploading the CSV files. The system provides the ability to add together it anywhere in your CSV file. At the same time, the column can exist left blank.
To use it, specify the name of the drove to add a product to. In the example of an existing collection, the product should follow the collection atmospheric condition. However, if it doesn't exist, Shopify creates a manual drove.
Note that the system lets you add a production to a single collection just.
Also, note that your CSV file with client data must be in UTF-8 format.
How to import inventory to Shopify
In improver to products, you can separately import inventory data into Shopify. This procedure updates inventory quantities only. Information technology neither creates a location nor updates the values that identify products. It is recommended to import your inventory only when other adjustments aren't taking place to avoid errors and possible bug. For instance, transferring the update during the ongoing sales or manual changes volition lead to incorrect production quantities.
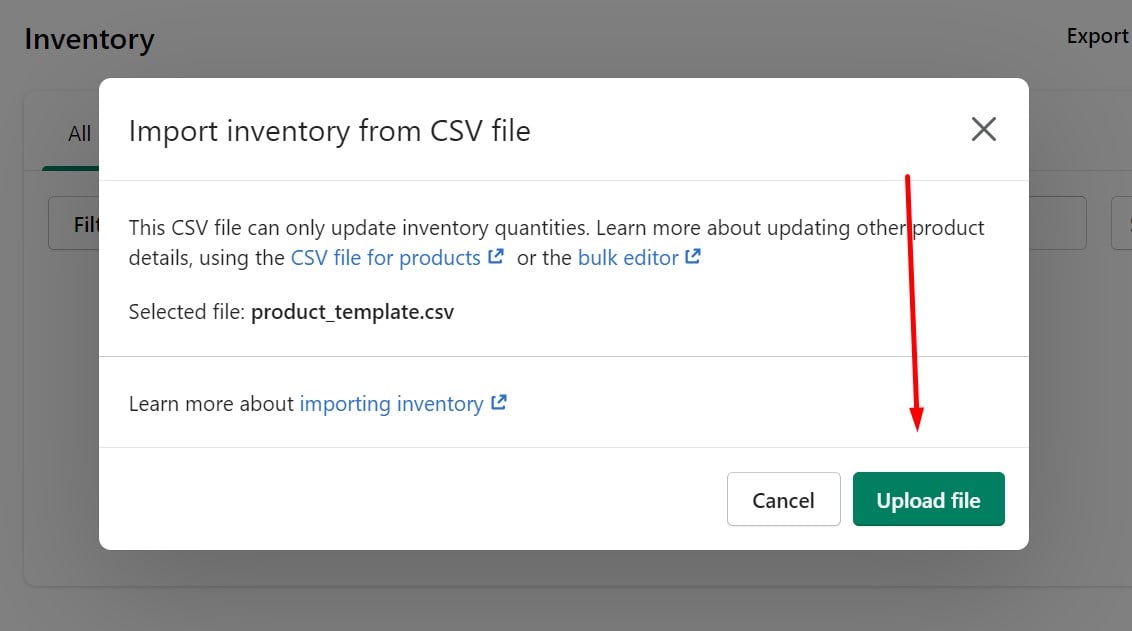
To import the inventory information to Shopify, follow these steps:
- Go to your Admin -> Products -> Inventory .
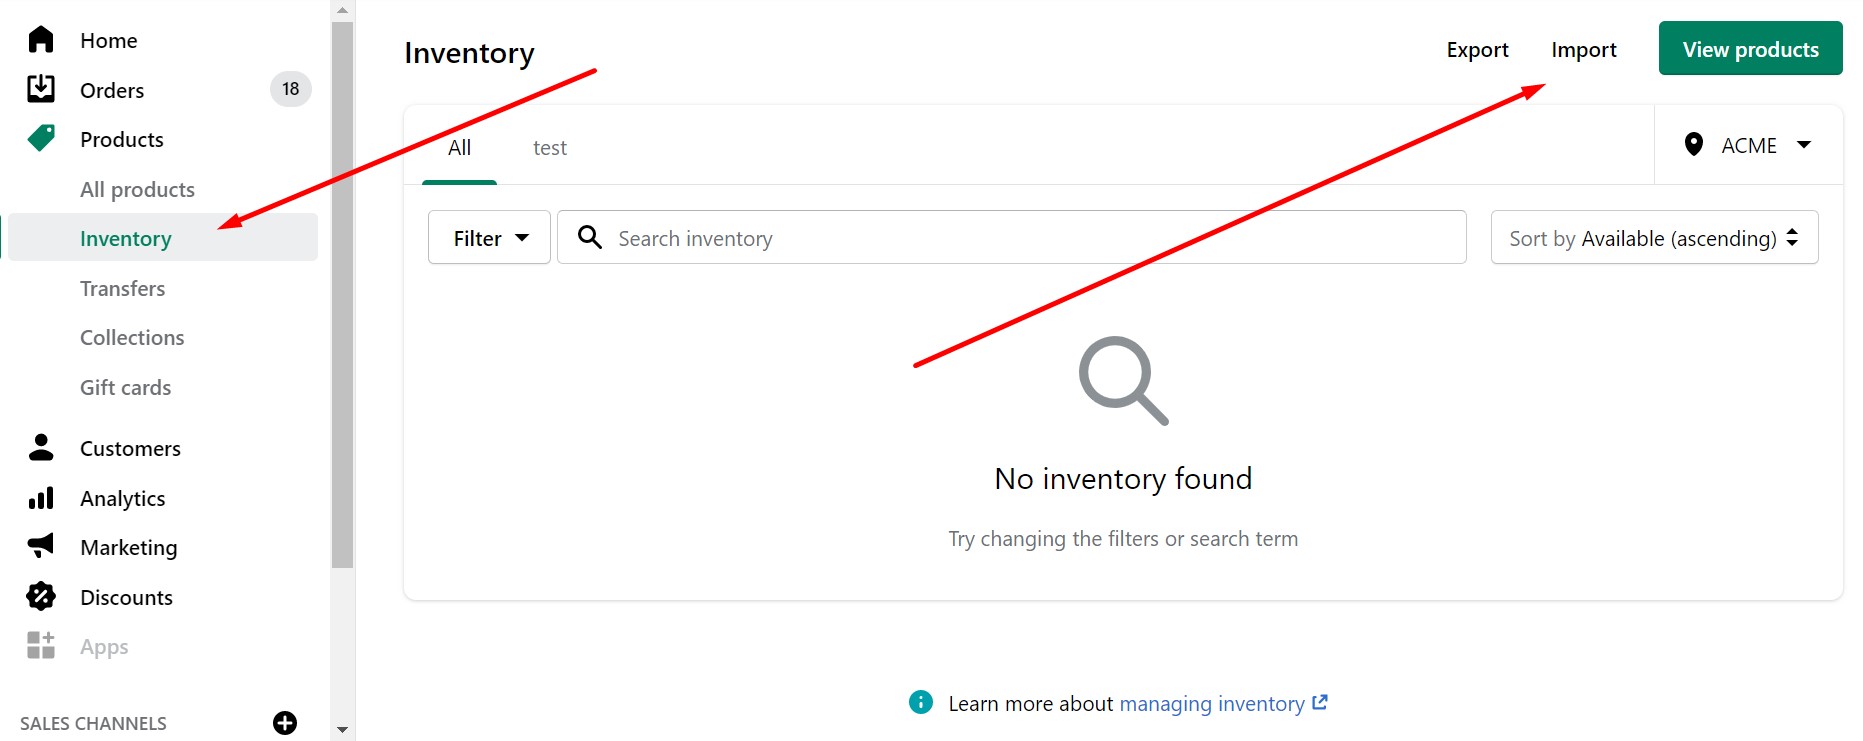
- Click Import and select your CSV file with the update.
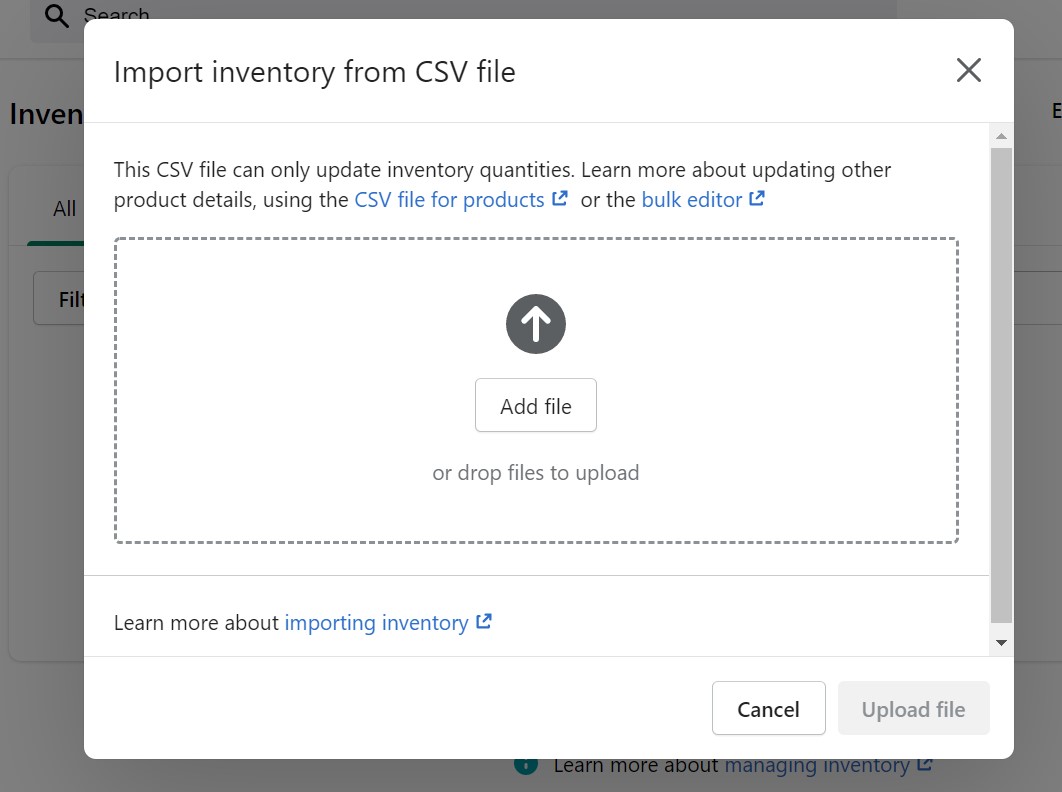
- Click Import inventory , verify what you intend to import, and hit the Kickoff import push.
Shopify inventory import: CSV file format
Shopify uses the inventory CSV files to transfer information that identifies products and product variants every bit well as their inventory quantities at a item location. The columns beneath are a part of the inventory canvas:
- Handle – here, Shopify displays a unique production name using letters, dashes, and numbers. Note that spaces are prohibited.
- Title – this cavalcade is optional. All the same, including it lets yous go out the values bare.
- Option1 Name – y'all can specify a product pick name, such as Color, here. Prepare information technology to Title for no options.
- Option1 Value – enter the values for the option to a higher place, such equally Black or White. If a production has no options, specify Default Championship in this column.
- Option2 Name , Option2 Value , Option3 Name , and Option3 Value follow the aforementioned requirements but can be left blank.
- SKU – this column is optional, so its values can exist left blank.
- HS Code – The Harmonized System Code column lets you approximate duties and taxes for international buyers. Since this column is besides optional, information technology can be left blank.
- COO – The Country/Region of Origin column too participates in estimating duties and taxes for international customers. Use only . Since this column is optional, it can be left blank.
- <Proper noun of location> – Shopify stores the corporeality of inventory in the location specified past the column proper noun. Bear in mind that the column heading is case sensitive. It means that it must be the name of one of your locations. Thus, you tin can add a column for each location to update inventory per place. Both positive and negative values are supported. Too, it is possible to enter 0 or Non stocked. The latter indicates that the product has never been stocked at the location. The erstwhile shows that no changes should be applied.
How to import customers to Shopify
Similar in the case of products, Shopify enables you to import customers in two ways. Firstly, you can create a customer CSV template, export it, utilize changes, then reimport the file back. Secondly, it is possible to build a custom CSV file and upload it to your Shopify website.
Annotation that the system constrains the customer import flexibility. Unfortunately, you cannot transfer CSV files larger than 1 MB. For 2 MB of client records, y'all will need two split CSV files.
Moreover, some of the customers' data can't exist imported into Shopify. Since passwords are encrypted, you cannot move them from other platforms to Shopify. Information technology means that information technology is impossible to movement customer accounts entirely. Shopify lets you transfer only customer records.
Information technology is impossible to import data virtually orders placed and coin spent on other e-commerce platforms. Then, how does Shopify conduct when yous endeavor to import customers?
As we've just mentioned, Shopify creates a customer tape when yous import customers using a CSV file. Each new record is aligned with a particular email accost in the file.
Thus, if your CSV file contains customers with duplicate email addresses or phone numbers, such records are skipped. Instead, Shopify transfers simply the last record with the aforementioned e-mail address or phone number. So, how to import a customer CSV file with duplicate email addresses or phone numbers to Shopify?
You can leverage a simple trick to do that. But delete all of the email addresses and phone numbers from the CSV file before importing it. Thus, you will transfer all records to your website, manually re-adding the e-mail addresses or phone numbers to the client records.
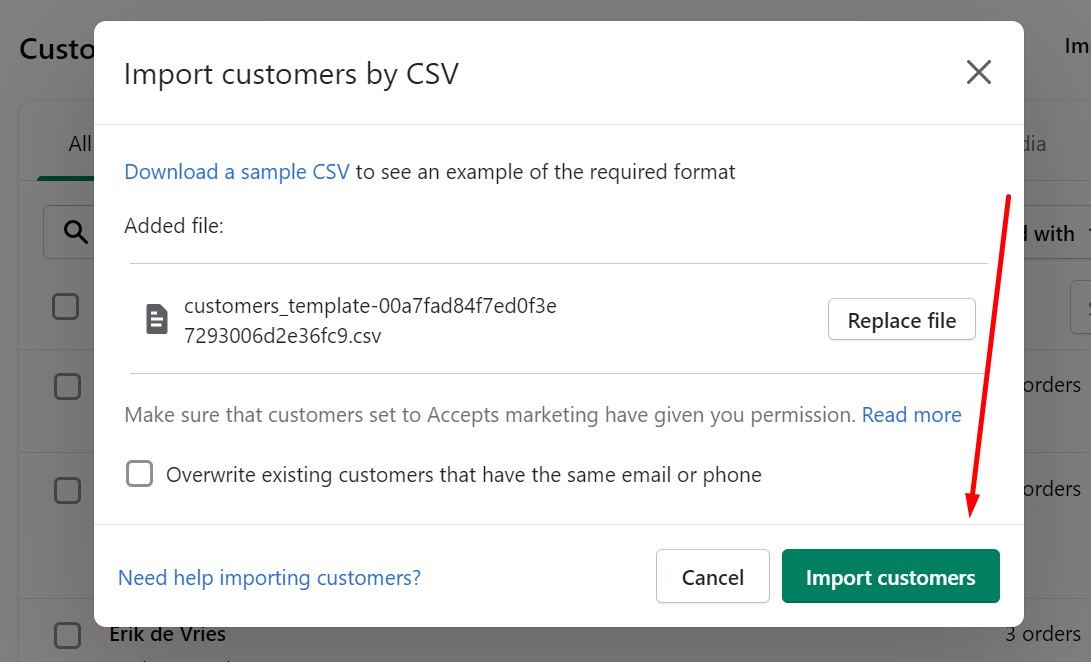
You tin can import customers to Shopify every bit follows:
- Become to the Shopify admin and click Customers .
- Cull the Import customers pick.
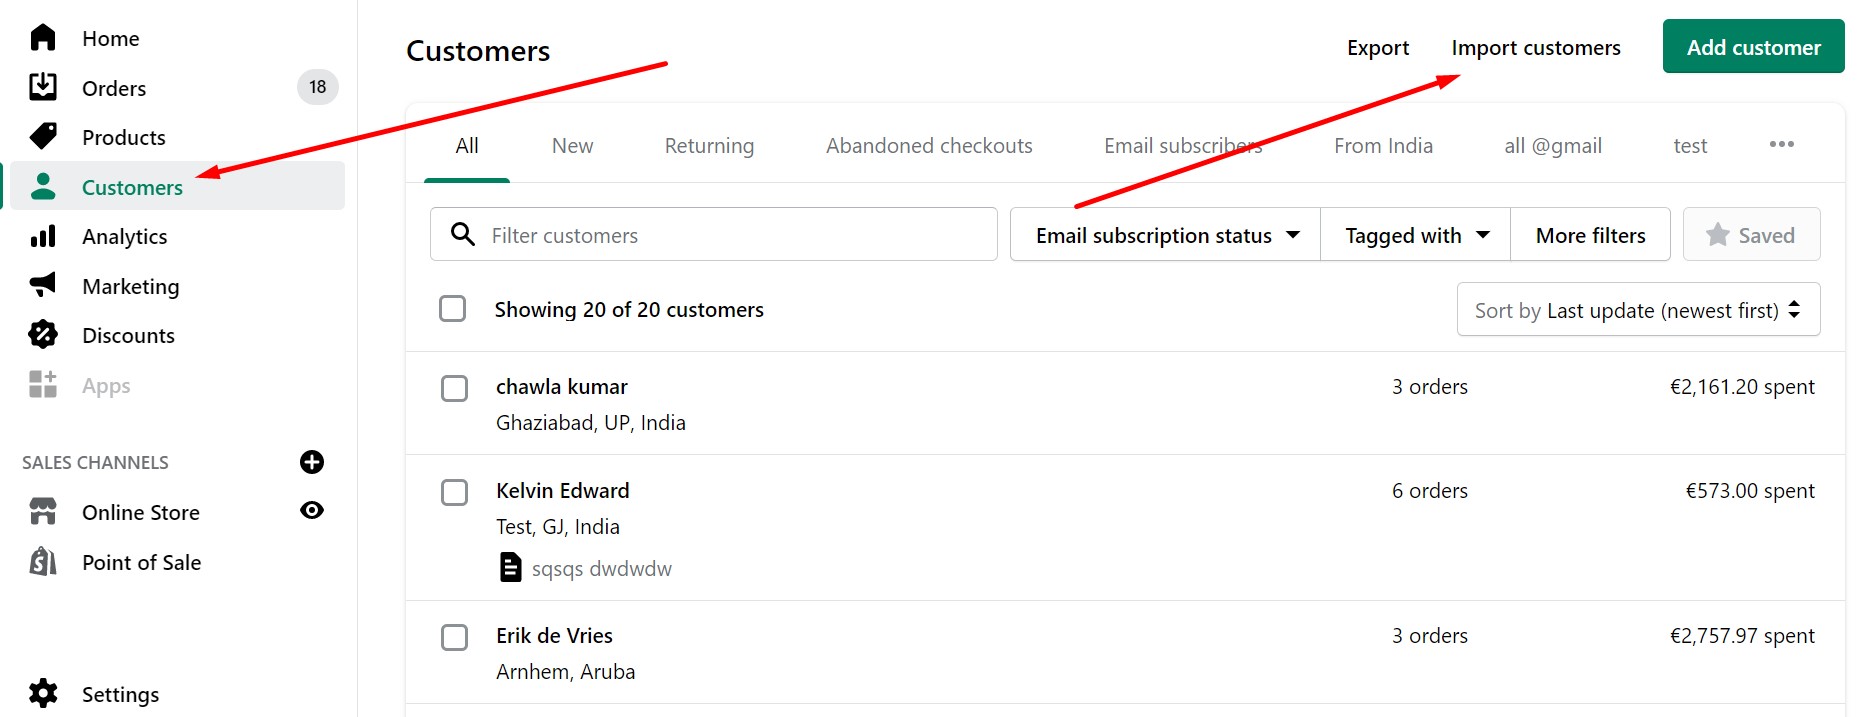
- You volition activate the Import Customers By CSV dialog where it is necessary to click Choose File and select your CSV with customer data.
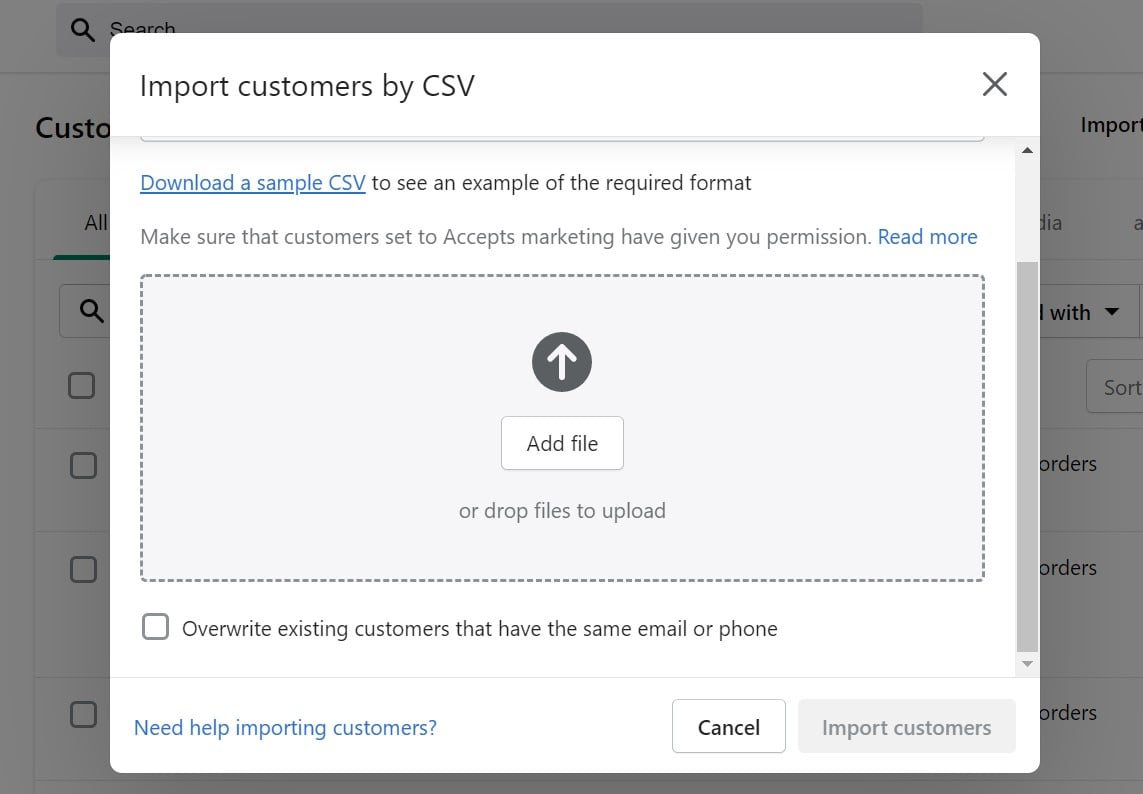
- Click the Overwrite existing customers that have the aforementioned email pick to update whatsoever existing customers.
- Hit the Import customers push button to launch the process.
Shopify customer import: CSV file format
Add together all the headers listed below to the outset line of your customer CSV. All of them are included in the customer CSV template. Too, annotation that all CSV file headers are case sensitive. Information technology means that y'all should strictly follow the examples that appear in the following tabular array. The incorrect capitalization may interrupt the Shopify import process.
And every bit we've only mentioned higher up, the Total Spent and Full Orders fields are not exist imported with client details.
- First Proper noun. The customer's first name.
- Last Name. The customer's final proper name.
- Email. The customer'southward electronic mail address.
- Company. The customer's visitor proper noun, if applicable.
- Address1. The customer's address first line.
- Address2. The customer'due south address 2nd line.
- City. The customer's city they live in.
- Province. The client's province or state they alive in. Information technology requires the Province Code .
- Province Code. Use only.
- Land. The customer's country they live in.
- Country Lawmaking. Specify hither.
- Zip. The customer's postal or zip code for their address.
- Phone. The customer's contact number.
- Accepts Marketing. In this column, you tin can find information on whether the client is subscribed ( yes ) to the newsletter or not ( no ). Note that the field is case-sensitive, so you must use simply lowercase values.
- Total Spent. Here, y'all can find the customer's total amount spent. Note that using a currency symbol is prohibited.
- Total Orders. This cavalcade contains information on the customer'southward total number of orders.
- Tags. Here, you can run across a comma-separated list of tags associated with the client. Usually, they await as follows: tag1 , tag2 , tag3 .
- Note. Any additional data about the customer is specified here.
- Tax Exempt. This cavalcade shows whether the customer is tax-exempt or not.
Notation that your CSV file with customer data must exist in UTF-viii format.
How to import orders to Shopify
If you desire to import orders to Shopify, you volition confront an obstruction that cannot be passed over. Importing this entity manually is impossible past default . Therefore, you need to find another style to transfer data unless you are a Shopify Plus user who has access to the Transporter app. Since the latter is available to a limited grouping of users, we'd like to draw your attention to a tertiary-party solution that every Shopify merchant can use.
Firebear Improved Import & Export App for Shopify
Y'all can dramatically improve all import processes on your Shopify website with the Firebear Improved Import & Export App. Our tool not just works with all the entities mentioned above but besides lets you transfer other blocks of data between your east-commerce storefront and any external systems.
Dissimilar the default import solution, our awarding provides full support for products, inventory, orders, customers, and categories. It also delivers the following functionalities:
- Import and export mapping for all entities . It means that yous can specify how to modify external data input to follow the native Shopify requirements.
- Support for CSV, Excel, and Google Sheet . Our extension works not just with CSV files only also with tables created in Excel. Besides, you can import data correct from Google Sheets.
- Flexible launch . You can not simply run import and export jobs manually, similar in the case of the native Shopify instruments, but also rely on schedules or events. For case, you can start inventory updates daily or subsequently a new social club is placed.
- Custom import source and export destinations . The Improved Import & Export Shopify app lets y'all upload data files direct to the arrangement, import them from URL, or transfer via FTP/SFTP.
- Diff only import, update only . The tool lets you update stock data and other fields by product ID/SKU.
- Alter data on the fly . It is possible to apply numerous changes before launching import and export. Our tool delivers the most intuitive way to alter capitalization, discover & supersede attributes, apply RegExp, merge and split values, etc.
You lot tin discover more information most the awarding here: Firebear Improved Import & Export App for Shopify . For further data on the enhanced Shopify import possibilities we offer, contact united states . We can likewise help y'all with data transfers between Shopify and numerous external systems.
(Download for Free)
Shopify Import FAQ
Let's provide answers to several questions that are often asked virtually Shopify import.
Can I upload a CSV to Shopify?
With the native Shopify tools, you tin only use CSV (comma-separated values) files to import products and other entities into your Shopify store. The same file format is bachelor for data transfers from your e-commerce website. If your import data is stored in some other format, you lot take to catechumen the file into CSV. Alternatively, it is possible to utilise third-party solutions that support the provided format. For example, you tin rely on the Improved Import & Consign app for Shopify to extend the existing spectrum of supported data standards.
Can you bulk upload products to Shopify?
Of course, y'all tin do that. The platform lets you bulk upload products, every bit well equally other entities, to your e-commerce website with the help of a specially formatted spreadsheet. As we've already mentioned, Shopify uses CSV files to perform this kind of bulk task. You can follow the recommendations posted above to run product, inventory, customer, and order import.
How do I import customers to Shopify?
Importing customers to Shopify is every bit like shooting fish in a barrel as transferring other entities to the platform. You but demand to follow several manifestly steps.
– Go to your Shopify administration and click Customers.
– Later that, hit the Import customers push.
– The system transfers you to the Import Customers By CSV dialog.
– You will see the Choose file button — click information technology and select your customer CSV file.
– Now, you have to decide on the import beliefs. Shopify lets you update the existing customers with the aid of the Overwrite existing customers that have the same e-mail feature.
– If everything is ready, click Import customers.
How exercise I import items into Shopify?
You lot can import items to Shopify equally follows:
– Become to your Shopify admin and proceed to Products -> All products.
– Notice the Import button and click it.
– The Import products by CSV file dialog displays — click Cull File here.
– At present, you demand to locate your CSV file and open up it.
– You lot tin override the existing product data by activating the Replace any current products that take the same handle checkbox.
– When all other parameters are configured, click the Upload file button.
How many products can I upload to Shopify?
Shopify's default import and consign tools are limited when information technology comes to product import. Unfortunately, you cannot freely transfer more than 50k products to your east-commerce website unless you use Shopify Plus. Once you hit the 50k limit, the platform doesn't let you import more than than i,000 products per mean solar day. Luckily, there is no need to switch to the platform's more expensive version to exceed the limitation. Alternatively, you can rely on the Improved Import & Export app for Shopify since this tool doesn't impose constraints on the number of records in a CSV file. Therefore, y'all can import any number of products per day.
How practise I import a product image into Shopify?
Shopify'due south basic production import process lets you upload product images to your e-commerce website. Use the Paradigm Src column to specify the URL of a production image. The system downloads images during the import and uploads them back. Alternatively, you lot can transfer product images manually every bit follows:
– Move to your Shopify admin.
– Choose Settings.
– Keep to Files.
– Select Upload files (top correct corner).
– Now, upload image files from your device to your Shopify admin.
– Use these images to fix new products in your Shopify store.
Also, you can use the Improved Import & Consign app to perform product import that transfers both production data and images.
Source: https://firebearstudio.com/blog/the-ultimate-guide-to-shopify-import.html
0 Response to "Can You Manually Create a Csv File and Upload to Shopify"
Post a Comment